I have found making sourdough bread overnight an easy evening routine. Here are seven simple steps using just “3 Perfect™ Ingredients” as Martha tags them for baking bread first thing in the morning by starting the evening before.
After my sourdough class at Abigail’s Oven, I went right home and went to work making bread. The process lasted into the night, then I recalled Martha Levie’s suggestion that making the dough and letting it rise overnight, then baking it in the morning.
Emilie Raffa agrees. In Artisan Sourdough Made Simple she wrote:
“Simply make the dough, let it rise overnight, and bake in the morning. It requires very little effort with big rewards. The crust is golden and crunchy, and the velvety crumb is perfect for sandwiches and toast.”
—Artisan Sourdough Made Simple, Kindle Edition.
Personally, I have found the overnight method an easy evening routine. Using Abigail’s Oven Country Loaf recipe, these simple steps deliver baked bread first thing in the morning.

Abigail’s 3 Perfect™ Ingredient Sourdough Bread
Ingredients
- 3⅔+¼ cups [640+60g] filtered spring water
- ¾ cup [170g] sourdough starter
- 5½ cups [700g] White bread flour (we suggest Abigail’s Oven Premium White Whole Wheat Flour)
- 2½ cups [300g] Whole-wheat flour (freshly ground if possible)
- 2 Tbsp [34g] Real® Salt
Directions
- The Day Before the Bake, activate your starter by mixing in a cup (120g) of flour with ½ cup (120g) water. Stir and allow the starter to double in a warm place for about four hours.
• In the winter, mine goes on top of the fridge, out of the way. The coils on a refrigerator give off some warmth. In summer, our home is plenty warm I just leave it out on the counter.
• If that does not fit into your schedule, then activate it in the morning before you go to work. Just put it in the fridge before leaving for work. Then take it out of the fridge at dinner time to warm it up some. - Make the Dough a few hours before going to bed, by whisking ¼ cup (50 g) active starter together with 3⅔ cups (640g) lukewarm water. (Remember to replenish your starter with ¼ cup of water and 1/3 cup of flour and set it aside.)
Stir in 8 cups (1000 g) of mixed flour. My personal choice is a mix of 5½ cups [700g] Abigail’s Oven Premium White Whole Wheat Flour combined with 2 cups [254g] freshly milled whole wheat or einkorn and ½ cup [64g] freshly milled rye. The dough will be quite stiff and will benefit from some mixing with your hands until the flour is fully incorporated.
• Cover and let this rest for 30 minutes. This resting period is called the autolyse; it allows wet ingredients and flour to work to form the gluten in the dough that holds gases during the long fermentation, but before adding the salt. This will help produce a better rise and a more complex flavor in the finished loaf.
• Meanwhile, mix 2 Tbsp [34g] salt with ¼ cup [60g] water and work this into the dough after the autolyse using a stretch-and-fold technique to further develop gluten.
• To stretch and fold take a corner of the dough in the bowl with wet hands, pull the dough up, and then fold it upon itself, rotate the dough, and repeat. This should make a smooth, elastic dough.
To start a set, dip one hand in some water, then Then using the wet hand, pick up a side of the dough, stretch it up, and fold it over itself.
That is the first of three for the first set. Next, rotate the bowl 120° (about a third of a turn) and repeat the stretching and folding as above. Then, rotate the bowl another 120° (or a third of a turn) and do the next stretch and fold. Then cover the dough to wait for the next set.
• Repeat this process every 30 minutes until it has been repeated four times.
• And after the fourth stretch-and-fold, cover the bowl with a damp towel and allow to rest until morning. You may need to refrigerate the dough if your kitchen is warmer than 70°F [21°] - Overnight Bulk Rise at room temperature (70°F [21°C]) for 8 to 10 hours. Because this dough rises slowly while you sleep, you won’t be tempted to rush the process and check progress too often. Just go to bed and let the magic happen.
The dough should be doubled in size, but to be sure, give it a test by poking the dough with your finger. If it springs back to the surface without a dent, it needs a bit more proofing. But if it leaves a dent and doesn’t spring back, it may be over-proofed. However, if it springs back just a bit and leaves a slight dent the dough is ready to go in the oven.


Baking Day Directions
- Shape the dough in the morning by first placing the dough on a lightly floured or oiled surface.
- To shape in a boule, start at the top and fold the dough over toward the center. Then roll the dough like a jelly roll, turn and repeat several times until the dough tensions together as shown to the right.
- Using a dough blade or your hands, turn the dough in a flat circle until it shapes into a ball.
- Flip the dough over letting it rest for 5–10 minutes while lining an 8-inch (20-cm) bowl or bread basket with a towel dusted with flour.
- “With floured hands, gently cup the dough and pull it toward you in a circular motion to tighten its shape.
- “Using a bench scraper, place the dough into the bowl, seam side up.”—Artisan Sourdough Made Simple

7. Final Proof
- Cover the baker’s basket or bowl and let the dough rise for 30–45 minutes.
- The dough is ready when it is puffy but has not yet doubled in size.
- Meanwhile, preheat the oven to 465°F (240°C).
- Cut a sheet of parchment to fit the size of your dutch oven but leaving enough excess around the sides so you can easily place the dough into the hot dutch oven and not get burned.

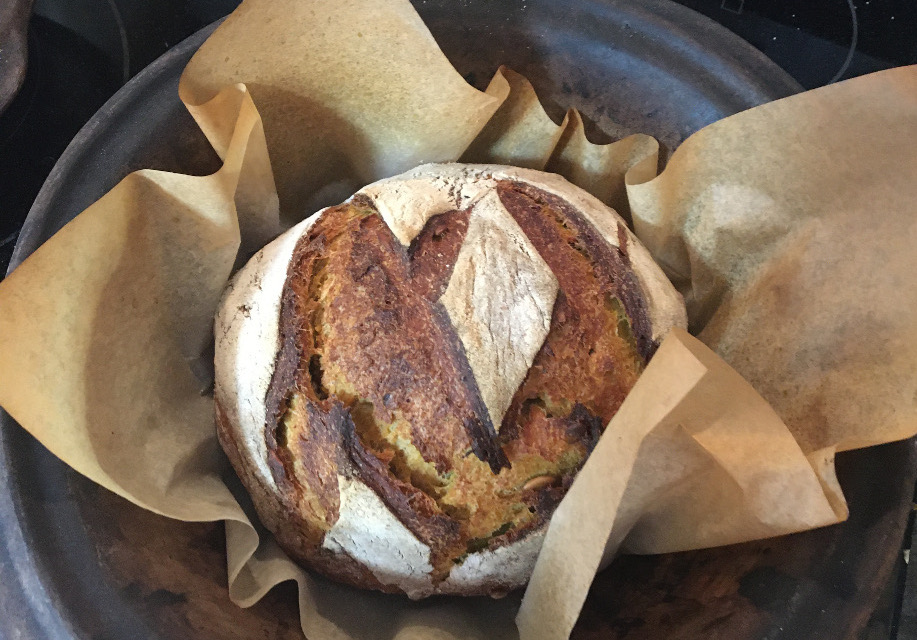
8. Score the Loaf
- Invert the bowl onto parchment (I hold my hand under the bowl with the parchment on my palm).
- Dust the top of the dough with flour. With your hands gently rub the surface spreading the flour evenly.
- Using a bread lame or a razor blade, score the dough in any way you’d like.
- Use the parchment to transfer the dough to the dutch oven.

9. Bake:
- Bake the dough on the middle rack of your oven for 20 minutes, covered (or uncovered in an oven with a pan of boiling water on a lower rack, which is how I do it).
- If baking without water, remove the lid and continue to bake for 20 more minutes to crisp the crust; the total time with heat is 40 minutes.
- Then turn off the heat, but leave the loaf in the oven for 20 or more minutes as it cools and the crust hardens.
- Transfer to a wire rack for final cooling before slicing.
While many folks like to eat bread hot, sourdough needs to cool completely before slicing to avoid a gummy center. Personally, I like it the second day, especially when I have added rye, which takes a day to develop flavor throughout the loaf.
In the comment section below tell us about how your first loaf turned out.


Recent Comments